OnBase – Unity Client installation & scanner setup/use
OnBase Unity Client
This article covers how to setup a workstation and scanner for importing a document or batches of documents into OnBase using the Unity Client installed on a Windows PC. To install the OnBase Unity Client, use Microsoft Edge to install from https://onbase.campus.pomona.edu/webdeploy/ (The installation will only work with Microsoft Edge).
Mac users and users without permissions to install software can access the Unity Client via the Staff Desktop in Azure Virtual Desktop. Alternatively, there is a web version of the Unity Client which is compatible with most modern browsers: https://onbase.campus.pomona.edu/AppNet
NOTE:
Use these links for the Development versions of the Unity Client and Web Client.
Scanner Setup
This section outlines the basic standard install for Fujitsu fi-series scanning hardware. This process will install the base imaging components and register the client with the SCA server for package updates and department specific configuration (if enabled). Custom solutions may require additional configuration.
Initial client configuration packages must be installed prior to linking the client PC and scanner hardware into the SCA server. Packages are preconfigured per scanning hardware model and stored on Filer1:
-
Path: \\filer1\ServerSoftware\Scanner_Software
Installing from these custom packages will automatically register the scanning hardware with the SCA server as part of the installation process. Additional configuration may be required from the SCA console to deploy user/departmental specific packages to the client node.
Select the installation package from the above path based on the model of scanner hardware being installed. Run setup.exe to begin the installation process:
- Launch "setup.exe" to begin the installation process.
- Select "Installation (Custom)" from the setup menu.
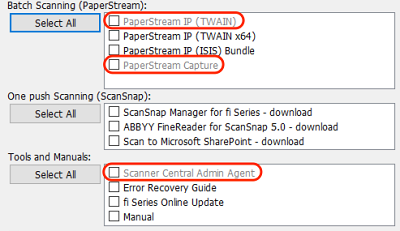
- Select the following sub-components for installation:
- PaperStream IP (TWAIN)
- PaperStream Capture
- Scanner Central Admin Agent
- Accept the licensing agreement and click Install.
- Do not update the installed components.
Configuring a Workstation for scanning
Perform these steps to configure a new scan workstation. Not all users will have access to make these changes; contact the Information Systems Team for assistance, if necessary. You should only have to perform these steps once for each scan workstation.
- Have the primary user of the workstation log into the Unity Client with their Pomona credentials.
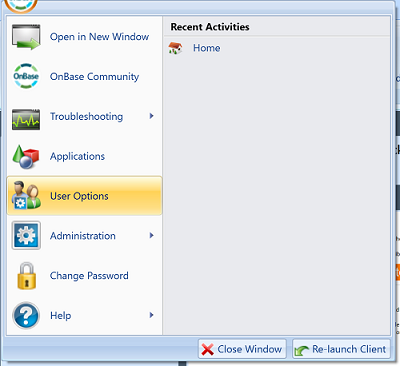
- Click the OnBase icon in the upper left corner and select User Options then select Imaging from the menu.
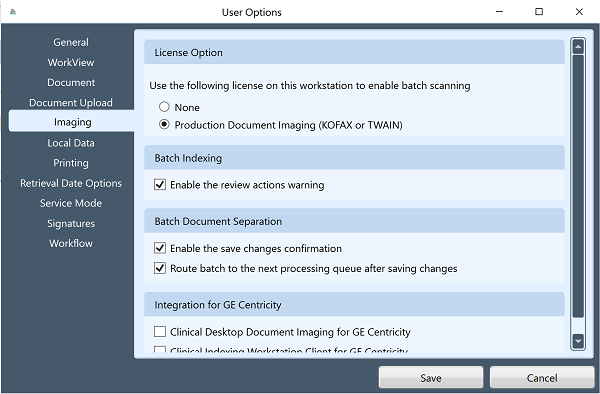
- Select Production Document Imaging (KOFAX or TWAIN) and click Save.
NOTE:
If this radio button option is greyed out, the workstation that is being configured is not currently licensed for Product Document Imaging. Once the user has logged into the Unity Client from that workstation, it will be registered in the system. An OnBase Administrator will then need to provision the appropriate license to allow for that workstation to perform batch scanning in the Unity Client.
Batch scanning documents in Unity
- Click Batch Scanning on the Home tab of the menu,

- Click the Manage Scan Formats icon under Configuration section of the Capture tab.

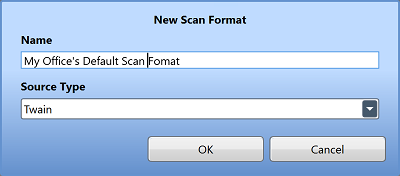
- Assign a name and source type for a new Scan Format (source type is typically Twain).
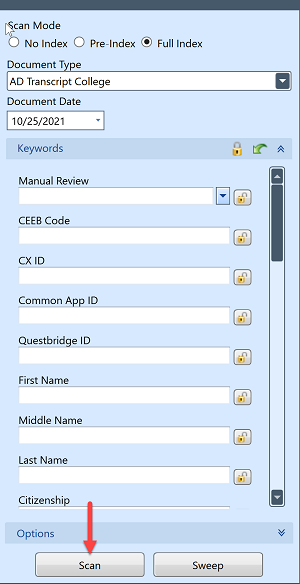
- Select a scan queue and scan format. Next, select one of the following scan modes:
-
No index: All document type selection and keyword value indexing will occur in Batch Processing after the batch is scanned.
-
Pre-index: The document type will be selected prior to scanning the batch. Keyword values can be entered as well, but the batch will still require additional indexing for other keyword values.
-
Full Index: The document type and all keyword values will be entered prior to scanning the batch. The batch will bypass the initial indexing status queue and will move straight to the Awaiting Commit status if no other indexing is required.
- Select the Document Type, Document Date and enter any keyword values (Pre-Index or Full Index only). At this time, make sure the documents have been placed into the scanner's feeder tray and are ready for scanning (staples, paper clips and sticky notes removed). When ready, click Scan in the lower right-hand panel or on the Capture tab of the menu.
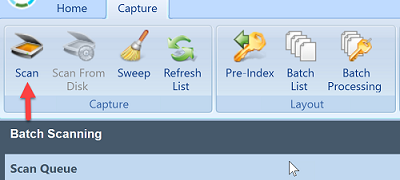
- When all pages have been scanned, you will be prompted with the following options.
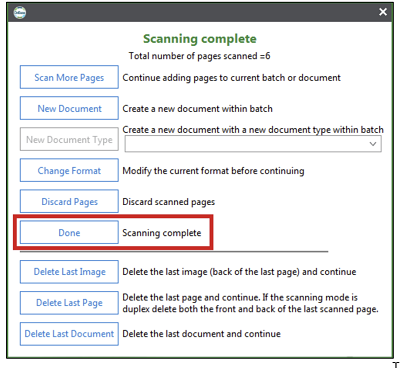
For most batch jobs, simply click 'Done' to complete the scanning process. You can review pages and make any necessary changes. If Advanced Document Review is enabled in User Options, that will be displayed at this time. When you are ready to send the batch to indexing, click Back to go back to Batch Scanning to scan another batch or Go to Batch to go to Batch Processing and begin indexing.