Automatically Recording a Meeting in Zoom
https://support.zoom.us/hc/en-us/articles/202921119-Automatic-Recording
Zoom is a cloud-based meeting tool which combines video conferencing, online meetings, and mobile collaboration into one platform. Its dependable, high-quality and easy to use design have made it so much easier for groups around the world to connect and collaborate.
If you experience issues with Zoom, you may refer to the additional documentation or contact the ITS help desk at 909-621-8061 or servicedesk@pomona.edu. Additional documentation is available via Pomona College ITS at https://ritg.pomona.edu/resources/instructional-continuity or the Zoom online knowledgebase: https://support.zoom.us/home.
If you choose to automatically record your meetings, the recording will automatically begin when you start the meeting.
Turning on Automatic Recording for All Meetings
This will not turn on automatic recording for meetings held with your personal meeting ID or for meetings that you scheduled before turning on automatic recording.
Go to pomonacollege.zoom.us and click Sign in. Log into your Zoom account.
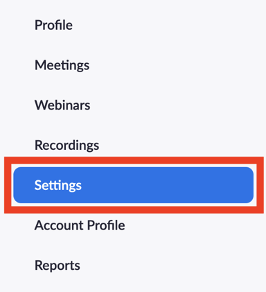
Click Settings from the menu on the left side of the screen.
3. Click the Recording tab.

4. Scroll down until you see the section titled Automatic recording (underneath the Cloud Recording Section).
5. Turn on automatic recording by clicking the slider next to Automatic recording. The slider will turn blue when automatic recording is on.

6. Additional options will appear.
a. Choose whether you want the automatic recordings to be recorded locally or on the cloud. See instructions on recording as the host for details on local vs. cloud recording.
b. If you choose to record in the cloud, another option will appear. Check the box next to “Hosts can pause/stop recording” to be able to pause the recording during the meeting.
i. If you don’t check this box, you will be unable to pause the recording or end the recording before the meeting end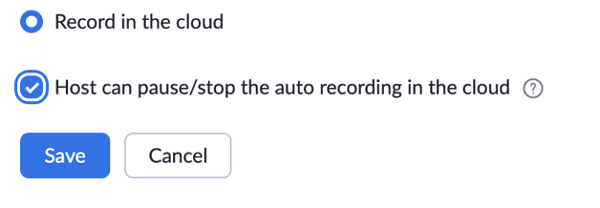
c. If you choose to record on your computer, you will always be able to pause and stop your recording.
7. After making any changes, a blue Save button will appear. Click this button.
Turning on Automatic Recording for an Individual Meeting
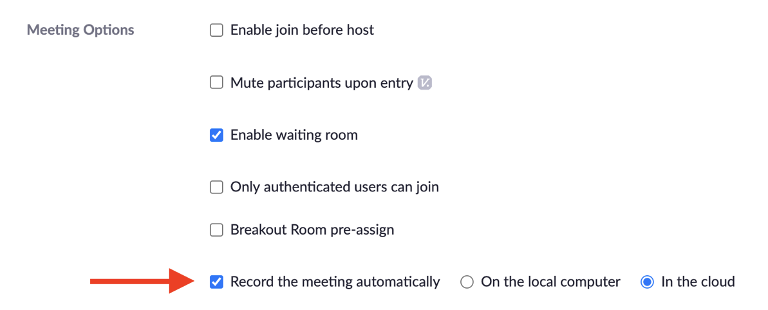
Create a meeting using the Zoom app, the Zoom website, or Sakai. In the meeting settings, there will be an option to turn on automatic recording.
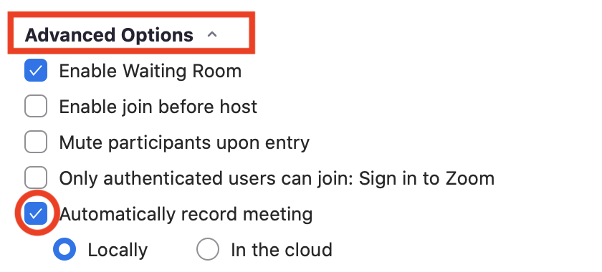
a. Check the box next to “Record the meeting automatically” and then choose to record on the computer or in the cloud.
b. Note: If you are scheduling using the Zoom app, click on Advanced Options to see the option for automatic recording.
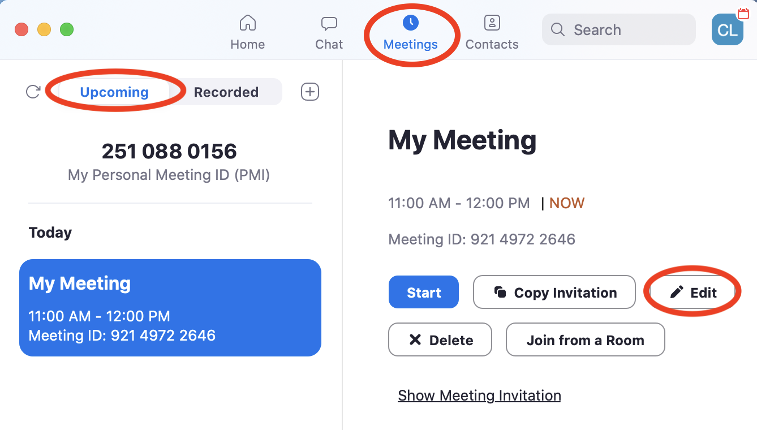
2. If you have already created the meeting, go to the Zoom app and click on Meetings at the top of the page. Under upcoming, click on the meeting and then click Edit.
3. Now, you can turn on automatic recording by checking the box next to “Automatically record meeting.”